
Thanks for Booking!
Below we have put together some helpful information for your venue rental. Please read the information below to assist with your venue rental.
ENTERING THE VENUE
-
The 2 floor lamps can be turned on.
-
The vanity mirror when entering the venue can be turned on.
-
To turn on the outside string lights, locate the power strip nailed to the wall behind the corner speaker.
-
There are on/off switches on the back of all 3 speakers.
FRONT DOOR OPERATION
The front door will automatically lock once closed. To fully unlock the front door, follow the directions below:
-
Open the door and then press and hold in the lock latch. You will then put the key in and a turn the key to the right until the key will go no further.
-
Let go of the lock latch and turn the key back to the center and remove the key. The door is fully open and will not lock when closed.
-
To release the lock latch, enter the key and turn to the left. The lock will be released, and the door will lock again when closed.


GENERAL INFORMATION
-
Please do not drag/slide the tables and chairs across the floor. They will leave marks on the floor.
-
There is absolutely no smoking in the venue. We do not allow hookahs in the venue.
-
You can contact us at 980-414-6744 with any questions.
-
All trash must be removed from the venue before leaving. Trash should be placed in the back dumpster located in the back parking lot. Any trash left in the rental will result in not receiving a full refundable deposit. Brooms, Mops & Trash bags are located in the storage room.
-
Fire extinguishers are located in the kitchen and throughout the venue. First aid kit is located in the kitchen cabinet.
-
Our venue is a blank canvas for you, but we ask you to be careful with decorations. ABSOLUTELY NO NAILS, SCREWS, GLITTER, SMOKE. Please use light adhesive tape in order to not damage the walls. If the venue is damaged in any way, you will be financially responsible for fixing.
-
The venue is equipped with 3 additional air conditioners that is controlled by 1 remote. The remote will be located above the air control panel and you must use the remote to power on each unit separately. Please do not turn the central air thermostat under 69 degrees.


WIFI
WIFI Name: LoveandLaughWIFI
WIFI Password: QueenCity_3116
TV
We have a 55 inch smart TV located in the venue with a HDMI connection located below the TV. You will be able to connect via laptop.
PARKING
Our parking lot can fit around 25 to 30 vehicles depending on parking layout. We have parking in the front, side and back of our building plus the white building on the side. Our venue has additional parking located at the surrounding businesses. Please see parking diagram below. It is your responsibility to communicate to your guests where to park.


1
2
4
3
5
6
6
6
-
Nicks Veterinary Hospital
-
Weekday & Friday: May use any time after 6:00 PM.
-
Saturday & Sunday: May use any time
-
DO NOT BLOCK THE DOORS AT ANY TIME
-
-
Carolina Doggie Playland
-
Weekday & Friday: May use after 7:00 PM.
-
Saturday: May use between 10:30 AM – 4:30 PM & After 6 PM
-
Sunday: May use between 9:00 AM – 3:30 PM & After 6 PM
-
-
The Neighborhood Garage
-
Weekday & Friday: May use after 6:30 PM.
-
Saturday & Sunday: May use anytime
-
-
Satto Tires & Service
-
Weekday & Friday: May use after 6:30 PM.
-
Saturday: May after 4:30 PM
-
Sunday: May use any time
-
-
Noble Worldwide Logistic (Pay): Please contact them before using their parking lot. Anthony De Piante: anthony.depiante@noble-worldwide.com, Direct: 980-202-7323, Cell: 704-743-7850. Failure to contact the, before using their parking lot might result in being towed at your own expense.
-
You are able to park on Herman Street, Foster Avenue & May Street
SETUP & BREAKDOWN/CLEAN-UP
Before setting up for your event, please do a walkthrough of the venue to ensure there is nothing that needs to be addressed by our staff. If for any reason you find something unsatisfactory, don’t hesitate to contact us. Before exiting the venue, please follow the directions below:
Main Room
-
Remove all trash and take to back dumpster.
-
Clean up all spills if any.
-
Ensure no food particles are left on linen (If applicable).
-
Take chair covers off chairs and place them in a pile in the middle of the floor (If applicable).
-
Place all linens in a separate pile on the floor (if applicable).
-
Stack Chiavari Chairs (stacks of 5) and place on wall neatly (if applicable).
-
Pick up large trash items from floor.
-
Take down and discard all decorations.
-
Leave rental add-ons in position found unless otherwise instructed.
-
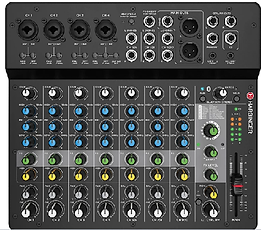
Turn off PA mixer and speakers
-
Turn off all Central air conditioning and other air units if using.
Kitchen
-
Remove all trash and take to back dumpster.
-
Throw out all leftover food.
-
Empty all bottles, cans, glasses, and cups and place them in the appropriate bins. Clean all dirty dishes, glasses, utensils, and tableware (if applicable).
-
Wipe down all counters and sinks in kitchen (if applicable).
-
Make sure oven is turned off.
-
Leave in its original form upon arrival.
Bathrooms
-
Empty all trash.
-
Ensure no trash items are left on the floor including toilet paper
SOUND SYSTEM
-
Our PA Sound System is Bluetooth/Aux compatible. Please see the steps below to setup.
-
Turn on all devices
-
Mixer
-
Both Speakers
-
Subwoofer
-
-
Press the Bluetooth “Pair” button on the mixer. A blue light should now be clinking rapidly.

4. Turn on your wireless Bluetooth on your phone or laptop and connect to “Harbinger Mixer”. Once
connected, the blue light will stop blinking.
Note…you might have to try connecting a few times before it connects.
You may also connect via an aux cord by inputting the aux cord in the stereo channel socket and
pressing the 4J button.

5. You are now connected and can play your music. To turn up the volume, make sure your laptop or
phones media volume its up. Next, you can use the main sound button to turn it up more. Please be
aware that if you turn it up to loud, you will bust the speakers. If this happen you will be liable to
replace the sound system. Be careful not to bust the speakers or you will be responsible for buying a
new sound system.

6. To use the wireless microphone, first press and hold the power button on the receiver (shown below).

7. Next, turn on the microphone by pressing and holding the mute/unmute button. A green light should
appear when it is on. The microphone should automatically be connected to the receiver and on
now.

PROJECTOR
1. To lower the projector screen, take the projector screen remote and press the down arrow.

2. Now it is time to turn on the projector. Press the power button on the projector remote. Wait a few
seconds and you will see a menu screen on the projector.

3. You will now be able to connect to the projector wirelessly via your phone or your laptop
Connect via Laptop
1. Make sure you are connected to the WIFI above.
2. Use the “Search” bar on your laptop and find the “connect to a wireless display” option.

3. Once on that screen, press connect. Your computer will then search for wireless devices. You should then see device EB12563F or LLEPSON. Whichever one that comes up, select that device. After selecting the device, the screen below will appear. Make sure you check "Duplicate"

4. Make sure you select duplicate.
5. You should now see your laptop on the projector screen.
NOTE…To disconnect, go back to the “connect to a wireless device” and disconnect.
6. Remember to turn off the projector and raise the projector screen using the up button on the
projector screen remote.
Connect via Phone
1. Make sure you are connected to the WIFI above (LoveandLaughWIFI).
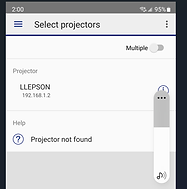
2. You will need to download the app “EPSON – iProjection” in order to connect your phone to the projector.
3. Once download the app, turn your Bluetooth on and open the EPSON – iProjection” app. Projector LLEPSON should now be listed under the projector section. If projector LLEPSON is not displaying, you need to make sure you are on the LoveandLaughWIFI.

4. Click on the LLEPSON projector which will take you to the next screen (see below). You are now ready to screen share your phone. Click the Mirror device screen toggle button and start screen sharing. You can hit the toggle button again to stop sharing
5. The sound might come out of both your phone and the projector. Just turn your phone sound
down and turn up the projector sound with the projector remote.


